실시간으로 데이터 주고 받으면서 사용자들에게 좋은 경험을 만들어 주고 싶었다.
예를 들면, SNS 에서 누가 내 게시물을 좋아요 할때 바로 알림이 뜨게 하는 기능이다.
그래서 Socket , WebSocket , Kafka , SSE 등 여러가지 양방향, 단방향 통신 기능을 찾아보게 되었고 우선 Redis를 이용한 SSE 를 선택했다.
서버기준에서 클라이언트 단방향 통신이여서 불필요한 데이터 교환을 줄일 수 있었고, 클라이언트에서 딱히 서버쪽으로 보낼 데이터도 없었기 때문에 적합하다고 생각했다.
그럼 우선 Redis 의 SSE 에 대해서 알아보도록 하자 !
🟢 1. SSE(Server-Sent Events)란?
SSE는 클라이언트가 서버와 지속적인 연결을 유지하면서 이벤트를 수신하는 방식이야.
브라우저에서 EventSource API 를 사용해 쉽게 구현할 수 있어.
✅ SSE 특징
✔ 단방향 통신 (서버 → 클라이언트)
✔ 자동 재연결 지원 (네트워크 끊김 시 자동 복구)
✔ HTTP 기반 (별도 프로토콜 필요 없음)
✔ 브라우저 기본 지원 (WebSockets보다 간편)
🔵 2. Redis Pub/Sub과 SSE 결합하는 이유
SSE는 단일 서버에서는 잘 동작하지만, 멀티 서버 환경에서는 문제 발생 가능!
예를 들어 부하 분산된 서버가 여러 개 있으면, 특정 서버에서 발생한 이벤트를 모든 클라이언트가 받을 수 없을 수도 있어.
➡ 이 문제를 Redis Pub/Sub을 활용해서 해결 가능!
✅ Redis가 중앙 메시지 브로커 역할을 해서 모든 서버가 동일한 이벤트를 전송하도록 보장!
🟠 3. Spring Boot에서 Redis + SSE 구현하기
✅ 1) Redis 설정 (RedisConfig.java)
Spring Boot에서 Redis Pub/Sub을 사용하려면 RedisTemplate과 MessageListener를 설정해야 해.
import org.springframework.context.annotation.Bean;
import org.springframework.context.annotation.Configuration;
import org.springframework.data.redis.connection.RedisConnectionFactory;
import org.springframework.data.redis.connection.lettuce.LettuceConnectionFactory;
import org.springframework.data.redis.core.RedisTemplate;
import org.springframework.data.redis.listener.ChannelTopic;
import org.springframework.data.redis.listener.RedisMessageListenerContainer;

@Configuration
public class RedisConfig {

    @Bean
    public RedisConnectionFactory redisConnectionFactory() {
        return new LettuceConnectionFactory();  // Redis 연결 설정
    }

    @Bean
    public RedisTemplate<String, String> redisTemplate(RedisConnectionFactory connectionFactory) {
        RedisTemplate<String, String> template = new RedisTemplate<>();
        template.setConnectionFactory(connectionFactory);
        return template;
    }

    @Bean
    public RedisMessageListenerContainer redisContainer(RedisConnectionFactory connectionFactory) {
        RedisMessageListenerContainer container = new RedisMessageListenerContainer();
        container.setConnectionFactory(connectionFactory);
        return container;
    }

    @Bean
    public ChannelTopic topic() {
        return new ChannelTopic("sse-channel"); // Redis Pub/Sub 채널 설정
    }
}
💡 📌 설명:
✔ RedisConnectionFactory → Redis 연결 설정
✔ RedisTemplate → Redis 데이터를 주고받는 객체
✔ RedisMessageListenerContainer → Redis Pub/Sub 메시지를 받는 컨테이너
✔ ChannelTopic("sse-channel") → SSE 메시지를 전달할 Redis 채널
✅ 2) SSE Controller 구현 (SseController.java)
클라이언트가 SSE 연결을 요청하면, 서버에서 이벤트 스트림을 지속적으로 전송하는 방식이야.
import org.springframework.http.MediaType;
import org.springframework.web.bind.annotation.*;

import java.io.IOException;
import java.util.Map;
import java.util.concurrent.ConcurrentHashMap;

import jakarta.servlet.http.HttpServletResponse;

@RestController
@RequestMapping("/sse")
public class SseController {

    private static final Map<String, HttpServletResponse> clients = new ConcurrentHashMap<>();

    @GetMapping(value = "/subscribe/{clientId}", produces = MediaType.TEXT_EVENT_STREAM_VALUE)
    public void subscribe(@PathVariable String clientId, HttpServletResponse response) throws IOException {
        response.setContentType("text/event-stream");
        response.setCharacterEncoding("UTF-8");
        response.getWriter().write("data: 연결되었습니다.\n\n");
        response.getWriter().flush();

        clients.put(clientId, response);
    }

    public static void sendEvent(String message) {
        for (HttpServletResponse response : clients.values()) {
            try {
                response.getWriter().write("data: " + message + "\n\n");
                response.getWriter().flush();
            } catch (IOException e) {
                response.setStatus(HttpServletResponse.SC_GONE);
            }
        }
    }
}
💡 📌 설명:
✔ @GetMapping("/subscribe/{clientId}") → 클라이언트가 SSE 연결을 요청하는 엔드포인트
✔ 연결된 클라이언트 목록을 ConcurrentHashMap에 저장해서 여러 클라이언트에 이벤트를 전송 가능
✅ 3) Redis Pub/Sub 리스너 (RedisSubscriber.java)
Redis에서 발행된 메시지를 받아 SSE를 통해 클라이언트로 전송하는 리스너를 만들어야 해.
import org.springframework.data.redis.connection.Message;
import org.springframework.data.redis.connection.MessageListener;
import org.springframework.stereotype.Service;

@Service
public class RedisSubscriber implements MessageListener {

    @Override
    public void onMessage(Message message, byte[] pattern) {
        String msg = new String(message.getBody());
        System.out.println("Redis에서 받은 메시지: " + msg);
        SseController.sendEvent(msg);  // 받은 메시지를 SSE 클라이언트에게 전송
    }
}
💡 📌 설명:
✔ Redis에서 Pub/Sub 메시지를 받으면 onMessage()가 실행됨
✔ SSE 컨트롤러를 통해 모든 클라이언트에게 메시지를 전달
✅ 4) 메시지 발행 컨트롤러 (MessageController.java)
Redis에 메시지를 발행하면, 모든 SSE 클라이언트가 메시지를 실시간으로 받게 됨!
import org.springframework.data.redis.core.RedisTemplate;
import org.springframework.data.redis.listener.ChannelTopic;
import org.springframework.web.bind.annotation.*;

@RestController
@RequestMapping("/message")
public class MessageController {

    private final RedisTemplate<String, String> redisTemplate;
    private final ChannelTopic topic;

    public MessageController(RedisTemplate<String, String> redisTemplate, ChannelTopic topic) {
        this.redisTemplate = redisTemplate;
        this.topic = topic;
    }

    @PostMapping("/send")
    public String sendMessage(@RequestParam String message) {
        redisTemplate.convertAndSend(topic.getTopic(), message);  // Redis에 메시지 발행
        return "Message sent: " + message;
    }
}
💡 📌 설명:
✔ POST /message/send?message=안녕 → 메시지를 Redis에 발행
✔ Redis에서 메시지를 구독하는 서버들이 이를 감지하고, SSE를 통해 모든 클라이언트에게 실시간 전송
🟢 4. 클라이언트에서 SSE 연결하기
브라우저에서 SSE를 사용하려면 JavaScript의 EventSource 객체를 활용하면 돼.
✅ SSE 클라이언트 코드 (JavaScript)
const eventSource = new EventSource("http://localhost:8080/sse/subscribe/user123");

eventSource.onmessage = function(event) {
    console.log("📢 받은 메시지: ", event.data);
};

eventSource.onerror = function(event) {
    console.error("SSE 연결 오류 발생", event);
};
💡 📌 설명:
✔ new EventSource(URL) → SSE 연결을 생성
✔ onmessage → 서버에서 메시지를 받을 때 실행
✔ onerror → 오류 발생 시 실행
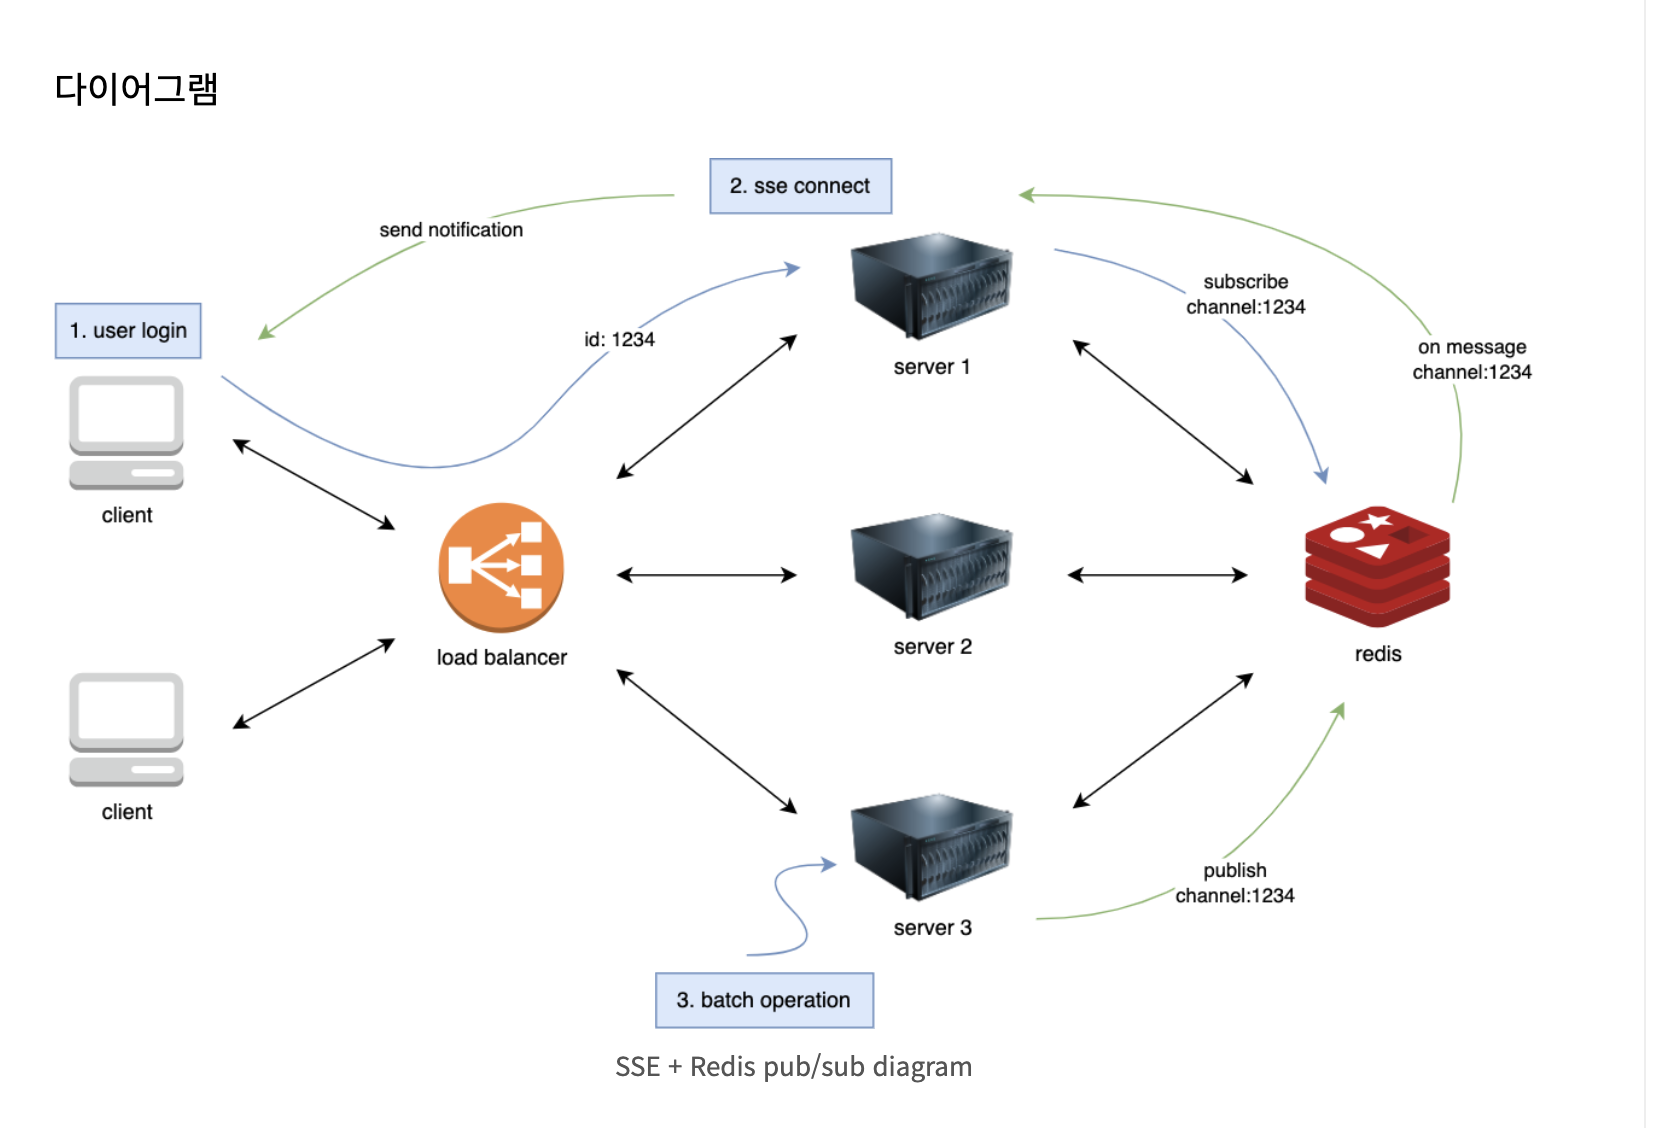
🔥 5. Redis SSE 아키텍처 정리
1️⃣ 클라이언트(SSE 구독) → 서버에 연결 유지
2️⃣ 다른 클라이언트가 메시지 전송 요청 (POST /message/send)
3️⃣ 서버는 메시지를 Redis에 발행 (convertAndSend)
4️⃣ Redis는 이를 모든 서버에 전송 (Pub/Sub)
5️⃣ 각 서버는 SSE를 통해 연결된 클라이언트에게 실시간으로 전송
🚀 6. Redis SSE 정리
✅ 멀티 서버 환경에서 SSE를 안정적으로 운영 가능!
✅ Redis Pub/Sub을 활용해 실시간 메시지를 여러 서버에 동기화
✅ 클라이언트는 단순한 EventSource로 쉽게 SSE 적용 가능
이제 Spring Boot + Redis + SSE 조합으로 확장성 있는 실시간 시스템 구축 가능! 🚀🔥
그렇다면 Redis의 SSE 에 대해 실시간 알림 구현에 대해 알아보도록 하자 !

내가 스프링부트에서 했던 설정작업들이다.
@GetMapping(value = "/connect/{room_uuid}", produces = MediaType.TEXT_EVENT_STREAM_VALUE)
    public ResponseEntity<SseEmitter> connectRedisSSE(@PathVariable(value = "room_uuid") String room_uuid)
            throws IOException {
        return sseService.connect("dummyData");
    }
우선 저렇게 설정해준다.
private SseEmitter createEmitter() {
        SseEmitter emitter = new SseEmitter(/* 30 * 1000L */0L);
        schedulers.setEmitter(emitter);
        emitter.onCompletion(() -> {
            log.info("[emitter.onCompletion...]");
            if (emitters.get(id) != null) {
                emitters.remove(id);
            }
            schedulers.stopScheduler();
        });
        emitter.onTimeout(() -> {
            if (emitters.get(id) != null) {
                emitters.get(id).complete();
            }
            emitters.remove(id);
            log.info("[emitter.onTimeout...]");
        });
        emitters.put(id, emitter);
        return emitter;
    }
우선 에미터 생존시간을 무한대로 ( 0L ) 로 했다. 원래는 30초이다 ( 30 * 1000L )
/* 레디스 SSE 데이터 전송 */
    public ResponseEntity<Boolean> sendEvent(String room_uuid, String user_uuid) {
        SseEmitter emitter = emitters.get(id);
        if (emitter != null) {
            try {
                emitter.send(SseEmitter.event().name(room_uuid).data(user_uuid)
                        .reconnectTime(10 * 1000L));
                return ResponseEntity.ok(true);
            } catch (IOException e) {
                emitter.completeWithError(e);
                emitters.remove(id);
                log.info("[sseEmitter send Error]=> {}", e.getMessage());
                return ResponseEntity.status(HttpStatus.INTERNAL_SERVER_ERROR).build();
            }
        }
        return ResponseEntity.status(HttpStatus.INTERNAL_SERVER_ERROR).build();
    }
그리고 보내주면 된다 !!!!
하지만 다중서버일 경우에는 다르다 . 위와 같은 코드는 단일 서버기준으로 했기 때문에 다중서버일 경우에는 Kafka , RabbitQ 를 사용해야한다.
그렇다면 Redis를 사용하고 있는 부분은 어떻게 활용해야할까? 그건 Pub / Sub 로 실시간 데이터 주고받도록 Redis stream을 이용해야 한다.
RedisMessageService
...
import org.springframework.data.redis.core.RedisTemplate;
import org.springframework.data.redis.listener.ChannelTopic;
import org.springframework.data.redis.listener.RedisMessageListenerContainer;
import org.springframework.stereotype.Service;

@RequiredArgsConstructor
@Service
public class RedisMessageService {

    private final RedisMessageListenerContainer container;
    private final RedisSubscriber subscriber; // 따로 구현한 Subscriber
    private final RedisTemplate<String, Object> redisTemplate;

    // 채널 구독
    public void subscribe(String channel) {
        container.addMessageListener(subscriber, ChannelTopic.of(getChannelName(channel)));
    }

    // 이벤트 발행
    public void publish(String channel, NotificationDto notificationDto) {
        redisTemplate.convertAndSend(getChannelName(channel), notificationDto);
    }

    // 구독 삭제
    public void removeSubscribe(String channel) {
        container.removeMessageListener(subscriber, ChannelTopic.of(getChannelName(channel)));
    }

    private String getChannelName(String id) {
        return CHANNEL_PREFIX + id;
    }
}
Redis의 채널을 구독하고 이벤트를 발행하는 기능을 하는 RedisMessageService 객체를 따로 생성했다.
(메시지를 발행하는 Publisher는 로직이 단순해서 따로 분리하지 않고 RedisMessageService에 포함시켰다.)
RedisSubscriber
@Slf4j
@RequiredArgsConstructor
@Component
public class RedisSubscriber implements MessageListener {

    private final ObjectMapper objectMapper;
    private final SseEmitterService sseEmitterService;

    @Override
    public void onMessage(Message message, byte[] pattern) {
        try {
            String channel = new String(message.getChannel())
                    .substring(CHANNEL_PREFIX.length());

            NotificationDto notificationDto = objectMapper.readValue(message.getBody(),
                    NotificationDto.class);

            // 클라이언트에게 event 데이터 전송
            sseEmitterService.sendNotificationToClient(channel, notificationDto);
        } catch (IOException e) {
            log.error("IOException is occurred. ", e);
        }
    }
}
채널을 구독하는 Subscriber 객체이다.
채널로 메시지가 발행되면 onMessage() 메서드가 실행된다. 여기서 해당 유저에게 SSE 이벤트를 전송하면 된다.
NotificationService
@Slf4j
@RequiredArgsConstructor
@Service
public class NotificationService {

    private final NotificationRepository notificationRepository;
    private final AuthenticationService authenticationService;
    private final SseEmitterService sseEmitterService;
    private final RedisMessageService redisMessageService;

    public SseEmitter subscribe(String memberKey) {
        SseEmitter sseEmitter = sseEmitterService.createEmitter(memberKey);
        sseEmitterService.send(MsgFormat.SUBSCRIBE, memberKey, sseEmitter); // send dummy

        redisMessageService.subscribe(memberKey); // redis 구독

        sseEmitter.onTimeout(sseEmitter::complete);
        sseEmitter.onError((e) -> sseEmitter.complete());
        sseEmitter.onCompletion(() -> {
            sseEmitterService.deleteEmitter(memberKey);
            redisMessageService.removeSubscribe(memberKey); // 구독한 채널 삭제
        });
        return sseEmitter;
    }

    @Transactional
    public void sendNotification(NotificationEvent event) {
        Member member = authenticationService.getMemberOrThrow(event.memberKey());
        Notification notification =
                Notification.of(event.message(), event.notificationType(), event.relatedUri());
        notification.addMember(member);
        notificationRepository.save(notification);

        // redis 이벤트 발행
        redisMessageService.publish(event.memberKey(), NotificationDto.fromEntity(notification));
    }

    ...
}
마지막으로 수정된 NotificationService이다.
redis의 채널 구독 및 삭제는 emitter의 생명 주기와 같게 처리한다. 여기서 redis는 emitter의 이벤트 발송을 도와주는 역할이기 때문에 emitter가 기준이어야 한다고 생각했다.
Nginx 사용시 주의할 점
로컬에서 잘 동작하는 것을 확인하고 배포를 했더니 SSE 통신이 동작하지 않는 문제가 발생했었습니다.
원인을 찾아보던 중 Nginx는 기본적으로 Upstream으로 요청을 보낼때 HTTP/1.0 버전을 사용한다는 것을 확인했습니다.
HTTP/1.1은 지속 연결이 기본이기 때문에 헤더를 따로 설정해줄 필요가 없지만, Nginx에서 백엔드 WAS로 요청을 보낼 때는 HTTP/1.0을 사용하고 Connection: close 헤더를 사용하게 됩니다.
SSE는 지속 연결이 되어 있어야 동작하는데 Nginx에서 지속 연결을 닫아버려 제대로 동작하지 않았습니다.
따라서 아래와 같이 nginx 설정을 추가해야 제대로 동작합니다.
proxy_set_header Connection '';
proxy_http_version 1.1;
또 Nginx의 proxy buffering 기능도 조심해야 하는데요, SSE 통신에서 서버는 기본적으로 응답에 Transfer-Encoding: chunked를 사용합니다. SSE는 서버에서 동적으로 생성된 컨텐츠를 스트리밍하기 때문에 본문의 크기를 미리 알 수 없기 때문입니다.
Nginx는 서버의 응답을 버퍼에 저장해두었다가 버퍼가 차거나 서버가 응답 데이터를 모두 보내면 클라이언트로 전송하게 됩니다.
참고: https://docs.nginx.com/nginx/admin-guide/web-server/reverse-proxy/
문제는 버퍼링 기능을 활성화하면 SSE 통신 시 원하는대로 동작하지 않거나 실시간성이 떨어지게 된다는 것입니다. 따라서 SSE 응답에 대해서는 proxy buffering 설정을 비활성화 해주는 것이 좋습니다.
하지만 Nginx의 설정 파일에서 버퍼링을 비활성화하면 다른 모든 API 응답에 대해서도 버퍼링을 하지 않기 때문에 비효율적일 수 있습니다. 이때 nginx의 X-accel 기능을 활용하면 좋습니다.
백엔드의 응답 헤더에 X-accel로 시작하는 헤더가 있으면 Nginx가 이 정보를 이용해 내부적인 처리를 따로 하도록 만들 수 있습니다. 따라서 SSE 응답을 반환하는 API의 헤더에 X-Accel-Buffering: no를 붙여주면 SSE 응답만 버퍼링을 하지 않도록 설정할 수 있습니다.
참고사이트

'개발 > Springboot' 카테고리의 다른 글
| Springboot nginx wegsacket ssl 연결 통신 후 [WebSocket Error]java.net.ProtocolException: Expected HTTP 101 response but was '400 ' 에러해결법 (2) | 2024.10.14 |
|---|---|
| Springboot_ 이미지 보여주기 (0) | 2024.08.26 |
| vscode_ SpringBoot 프로젝트 만들기 (0) | 2024.08.20 |
| Springboot -SSE ( 로컬에서는 실시간 o / https nginx 서버에서는 실시간 x) (0) | 2024.06.23 |
| springboot https 적용기 (0) | 2024.06.05 |


